前言
本文具有强烈的个人感情色彩,如有观看不适,请尽快关闭. 本文仅作为个人学习记录使用,也欢迎在许可协议范围内转载或分享,请尊重版权并且保留原文链接,谢谢您的理解合作. 如果您觉得本站对您能有帮助,您可以使用RSS方式订阅本站,感谢支持!
动画背景介绍
在鸿蒙开发中动画分类比iOS开发的分类更加丰富,包含如下动画类别
- 属性动画(animation)
- 显式动画(animateTo)
- 关键帧动画(keyframeAnimationTo)
- 转场动画(Transition)
- 页面间转场(pageTransition)
- 组件内转场(transition)
- 共享元素转场(sharedTransition)
- 组件内隐式共享元素转场(geometryTransition)
- 路径转场(motionPath)
- 粒子动画(Particle)
详细资料来源鸿蒙开发文档-动画
属性动画animation

1
2
3
4
5
6
7
8
9
10
11
12
13
14
15
16
17
18
19
20
21
22
23
24
25
26
27
28
29
30
31
32
33
34
35
36
37
38
39
40
41
42
43
import { SizeT } from '@ohos.arkui.node';

@Entry
@Component
struct MTAnimation3 {
  @State message: string = '迈腾大队长';
  @State buttonSize: Size = {width: 266, height: 108};
  @State didChanged: boolean = true;

  build() {
    Row() {
      Column() {
        Text(this.message)
          .fontSize(50)
          .fontWeight(FontWeight.Bold)
        Button("sunyazhou.com")
          //.animation({}) // 公式:animation 增加到那个地方的后面,前面就会被animation管理,否则不生效
          .onClick( ()=> {
            console.log("点击sunyazhou.com按钮")
            if (this.didChanged) {
              this.buttonSize = {width: 166, height:80}
            } else {
              this.buttonSize = {width: 266, height:108}
            }
            this.didChanged = !this.didChanged //反置 交换
          })
          .width(this.buttonSize.width)
          .animation({
              duration: 1000,
              curve: Curve.EaseInOut,
              // iterations: 1, //执行次数,(动画来回算2次)
              playMode: PlayMode.Alternate, //动画结束停在动画结束的位置
              onFinish: ()=> {
                console.log("动画执行完成")
              }
          }) //我只负责前面的代码 有动画,后面的代码,我不管(在这里之前的代码都受animation控制)
          .height(this.buttonSize.height) //注意;这行代码不在动画范围内
      }
      .width('100%')
    }
    .height('100%')
  }
}
注意 :.animation动画只对添加代码之前的属性生效,之后的属性不生效,属性动画官网文档
显式动画(animateTo)
学过iOS开发都知道iOS中的显式动画是[UIView animateWithDuratio...]
1
+ (void)animateWithDuration:(NSTimeInterval)duration animations:(void (^)(void))animations API_AVAILABLE(ios(4.0));
在鸿蒙开发中,这种类型的动画叫做animateTo
先看下示意图,我想让图片旋转90度,然后再回去,这在iOS中直接就改transfrom,并且把改动的代码放到上述UIView的animation中皆可,
1
2
3
4
5
CGAffineTransformRotate(transform, M_PI_2); //旋转90°
...

CGAffineTransformIdentity;

这里 HarmonyOS的ArkUI示例代码演示:
1
2
3
4
5
6
7
8
9
10
11
12
13
14
15
16
17
18
19
20
21
22
23
24
25
26
27
28
29
30
31
32
33
34
35
36
37
38
39
40
41
42
43
44
45
46
47
48
@Entry
@Component
struct MTAnimation2 {
  @State message: string = '显式动画(animateTo)';
  @State rotateValue: number = 0;
  @State color: Color = Color.Blue;
  @State isStart: boolean = false;
  build() {
    Row() {
      Column() {
        Text(this.message)
          .fontSize(50)
          .fontWeight(FontWeight.Bold)
        Divider()
          .height(20)
        Image($r('app.media.sunyazhou'))
          .width(333)
          .height(333)
          .rotate({
            angle:this.rotateValue, //表面上是旋转功能, 实际上需要配合 x轴y抽z轴
            x:0,
            y:0,
            z:1,
          })
          .onClick(() => {
            animateTo({
              duration: 1000, //ms
              curve : Curve.EaseInOut, //动画速率
              onFinish:() => {
                this.message = "动画执行完成"
                this.color = Color.Green
              }
            }, ()=> {
              if (this.isStart) {
                this.rotateValue = 0
              } else  {
                this.rotateValue = 90
              }
              this.isStart = !this.isStart
            })
          })
      }
      .width('100%')
    }
    .height('100%')
  }
}
如果把.rotate中的x,y,z,都改成1并旋转625度的话是这样的

当我们在动画中连续点击动画的时候它很跟手,和iOS中的UIView Animation一样中间被打断直接执行下次显式动画,下图演示跟手效果. 
更多细节请访问 HarmonyOS官方文档 显式动画 (animateTo)
关键帧动画
关键帧动画在鸿蒙开发中是借助UIContext实现

1
2
3
4
5
6
7
8
9
10
11
12
13
14
15
16
17
18
19
20
21
22
23
24
25
26
27
28
29
30
31
32
33
34
35
36
37
38
39
40
41
42
43
44
45
46
47
// xxx.ets
import { UIContext } from '@ohos.arkui.UIContext';
@Entry
@Component
struct KeyframeDemo {
  @State myScale: number = 1.0;
  uiContext: UIContext | undefined = undefined;

  aboutToAppear() {
    this.uiContext = this.getUIContext?.();
  }

  build() {
    Column() {
      Circle()
        .width(100)
        .height(100)
        .fill("#46B1E3")
        .margin(100)
        .scale({ x: this.myScale, y: this.myScale })
        .onClick(() => {
          if (!this.uiContext) {
            console.info("no uiContext, keyframe failed");
            return;
          }
          this.myScale = 1;
          // 设置关键帧动画整体播放3次
          this.uiContext.keyframeAnimateTo({ iterations: 3 }, [
            {
              // 第一段关键帧动画时长为800ms,scale属性做从1到1.5的动画
              duration: 800,
              event: () => {
                this.myScale = 1.5;
              }
            },
            {
              // 第二段关键帧动画时长为500ms,scale属性做从1.5到1的动画
              duration: 500,
              event: () => {
                this.myScale = 1;
              }
            }
          ]);
        })
    }.width('100%').margin({ top: 5 })
  }
}
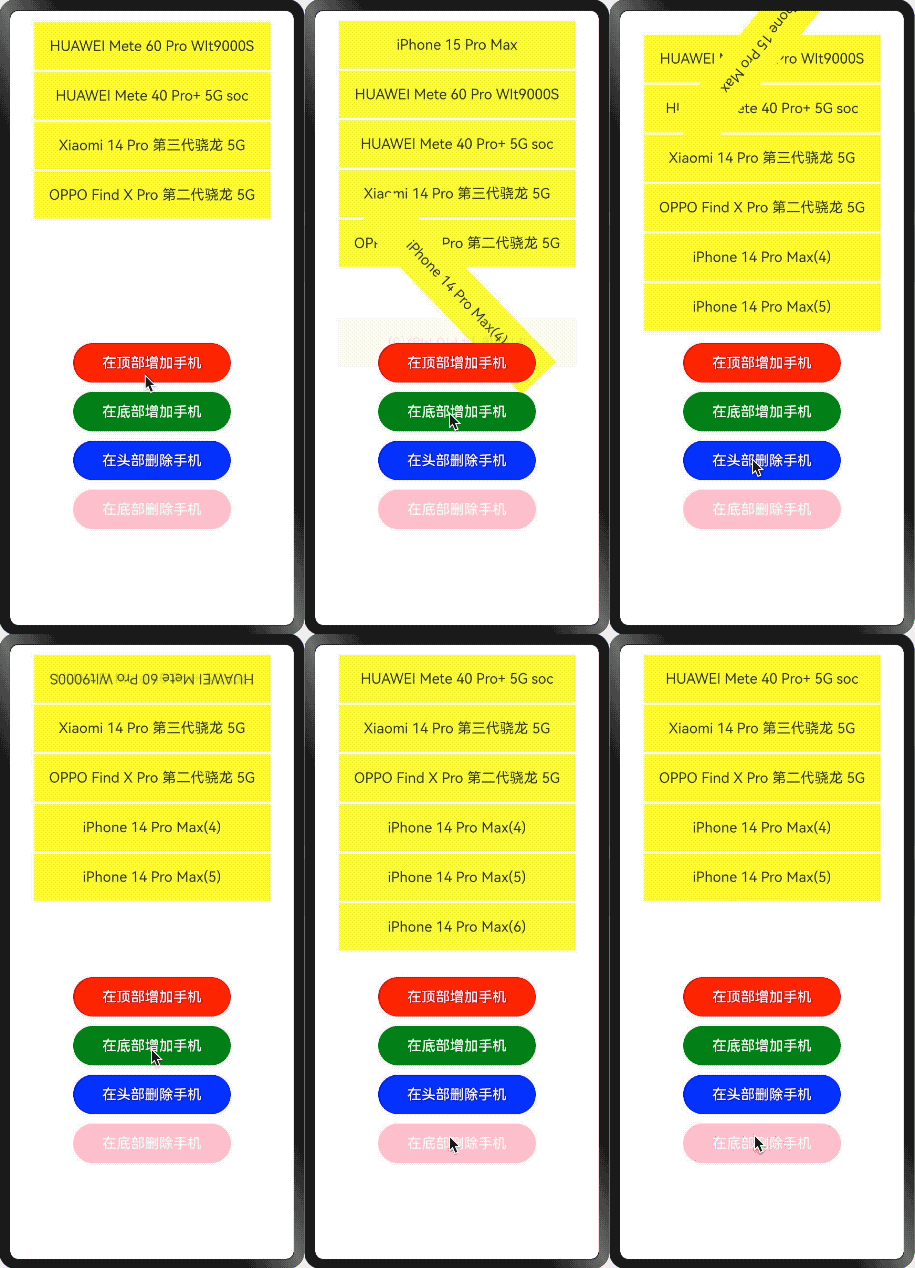
组件内转场动画
组件内转场动画
如下图: 
实现代码
1
2
3
4
5
6
7
8
9
10
11
12
13
14
15
16
17
18
19
20
21
22
23
24
25
26
27
28
29
30
31
32
33
34
35
36
37
38
39
40
41
42
43
44
45
46
47
48
49
50
51
52
53
54
55
56
57
58
59
60
61
62
63
64
65
66
67
68
69
70
71
72
73
74
75
76
77
78
79
80
81
82
83
84
85
86
87
88
89
90
91
92
93
94
95
96
97
98
99
100
101
102
103
104
105
106
107
108
109
110
111
112
113
114
@Entry
@Component
struct MTAnimation1 {
  @State phones: string[] = [
    'HUAWEI Mete 60 Pro WIt9000S',
    'HUAWEI Mete 40 Pro+ 5G soc',
    'Xiaomi 14 Pro 第三代骁龙 5G',
    'OPPO Find X Pro 第二代骁龙 5G'
  ]

  @State topIndex: number = 0
  @State bottomIndex: number = this.phones.length

  build() {
    Column({space:12}) {
      Column() {
        ForEach(this.phones, (item:string)=> {
           Text(item).ft_text()
             .transition(
               TransitionEffect.asymmetric(
                 // 1.出现时做从指定的透明度为0变为默认的透明度1的动画,该动画时长为1000ms,
                 // 以及做从指定的绕z轴旋转180°变为默认的旋转角为0的动画,该动画1000ms后播放,时长为1000ms
                 // 2.消失时做从默认的透明度为1变为指定的透明度0的动画,该动画1000ms后播放,
                 // 时长为1000ms,以及做从默认的旋转角0变为指定的绕z轴旋转180°的动画,该动画时长为1000ms
                 TransitionEffect.OPACITY.animation({ duration: 1000 }).combine(
                   TransitionEffect.rotate({ z: 1, angle: 180 }).animation({ delay: 1000, duration: 1000 })),
                   TransitionEffect.OPACITY.animation({ delay: 1000, duration: 1000 }).combine(
                    TransitionEffect.rotate({ z: 1, angle: 180 }).animation({ duration: 1000 })
                    // TransitionEffect.translate({x: 600, y: 0}).animation({duration: 1000})
                 )
               )
             )
             // .transition(TransitionEffect.OPACITY.animation({duration: 2000, curve: Curve.Ease})
             //   .combine(TransitionEffect.rotate({z: 1, angle: 180})
             //   ))

             // .transition(
             //   TransitionEffect.asymmetric(
             //     TransitionEffect.translate({x: 333, y: 333}),
             //     TransitionEffect.IDENTITY
             //   )
             // )
        }, (item: string) => JSON.stringify(item))
      }.ft_column()

      Button('在顶部增加手机').ft_btn(Color.Red,() => {
          animateTo({}, ()=> {
            if (this.topIndex == 0) {
              this.phones.unshift('iPhone 15 Pro Max')
            } else {
              this.phones.unshift('iPhone 15 Pro Max'+ '(' + this.topIndex + ')')
            }
            this.topIndex++
          })
      })
      Button('在底部增加手机').ft_btn(Color.Green, ()=> {
          animateTo({}, ()=> {
            if (this.bottomIndex == 0) {
              this.phones.push('iPhone 14 Pro Max')
            } else {
              this.phones.push('iPhone 14 Pro Max' + '('+ this.bottomIndex +')')
            }
            this.bottomIndex++
          })
      })

      Button('在头部删除手机').ft_btn(Color.Blue, ()=> {
        animateTo({}, ()=> {
          this.phones.shift()
        })
      })

      Button('在底部删除手机').ft_btn(Color.Pink, () => {
        animateTo({}, ()=> {
          this.phones.pop()
        })
      })
    }
    .width('100%')
    .height('100%')
  }
}

@Extend(Column) function ft_column() {
  .margin(10)
  .justifyContent(FlexAlign.Start)
  .alignItems(HorizontalAlign.Center)
  .width('90%')
  .height('50%')
}

@Extend(Text) function ft_text() {
  .width(300)
  .height(60)
  .fontSize(18)
  .margin({top: 3})
  .backgroundColor(Color.Yellow)
  .textAlign(TextAlign.Center)
}

@Extend(Button) function ft_btn(bgColor: Color, click: Function) {
  .width(200)
  .height(50)
  .fontSize(18)
  .backgroundColor(bgColor)
  .onClick(()=> {
    click() //此处的cLick是一个形参。具体代表的是调用除传进来的函数。后方跟小括号代表执行传进来的函数。
  })
}

function item(item: string, index: number): string {
  throw new Error('Function not implemented.')
}
这里比较核心的代码如下
1
2
3
4
5
6
7
8
9
10
11
12
13
14
15
16
17
18
19
20
21
22
23
24
25
Text(item).ft_text()
	 .transition(
	   TransitionEffect.asymmetric(
	     // 1.出现时做从指定的透明度为0变为默认的透明度1的动画,该动画时长为1000ms,
	     // 以及做从指定的绕z轴旋转180°变为默认的旋转角为0的动画,该动画1000ms后播放,时长为1000ms
	     // 2.消失时做从默认的透明度为1变为指定的透明度0的动画,该动画1000ms后播放,
	     // 时长为1000ms,以及做从默认的旋转角0变为指定的绕z轴旋转180°的动画,该动画时长为1000ms
	     TransitionEffect.OPACITY.animation({ duration: 1000 }).combine(
	       TransitionEffect.rotate({ z: 1, angle: 180 }).animation({ delay: 1000, duration: 1000 })),
	       TransitionEffect.OPACITY.animation({ delay: 1000, duration: 1000 }).combine(
	        TransitionEffect.rotate({ z: 1, angle: 180 }).animation({ duration: 1000 })
	        // TransitionEffect.translate({x: 600, y: 0}).animation({duration: 1000})
	     )
	   )
	 )
	 // .transition(TransitionEffect.OPACITY.animation({duration: 2000, curve: Curve.Ease})
	 //   .combine(TransitionEffect.rotate({z: 1, angle: 180})
	 //   ))

	 // .transition(
	 //   TransitionEffect.asymmetric(
	 //     TransitionEffect.translate({x: 333, y: 333}),
	 //     TransitionEffect.IDENTITY
	 //   )
	 // )
找了一下文档组件内转场 (transition)这里有详细的介绍.
这个动画有点类似iOS的仿射动画.只是平台不一样,这里的动画也非常丰富.后续会持续把其他动画实现一遍记录在这里
总结
鸿蒙开发已经学了3遍了,有时候需要记录一些动画和内容.全当学习笔记.希望能帮助其它开发者.