前言
本文具有强烈的个人感情色彩,如有观看不适,请尽快关闭. 本文仅作为个人学习记录使用,也欢迎在许可协议范围内转载或分享,请尊重版权并且保留原文链接,谢谢您的理解合作. 如果您觉得本站对您能有帮助,您可以使用RSS方式订阅本站,感谢支持!.
SwiftUI课程
最近坚持学习swiftUI,周末有空把第四章都看完了,我这里说的看是动手实践+教程学习.记录一些容易遗忘的内容
主要内容包括
- SwiftUI中对应的UIKit相似组件
- @AppStorage UserDefault的属性封装器
- .environment(\.colorScheme, shouldUseDarkMode ? .dark : .light)
- 编码和解码(序列化类型Json)
- 实现Codable协议自动生成
Decoder和Encoder
SwiftUI中对应的UIKit相似组件
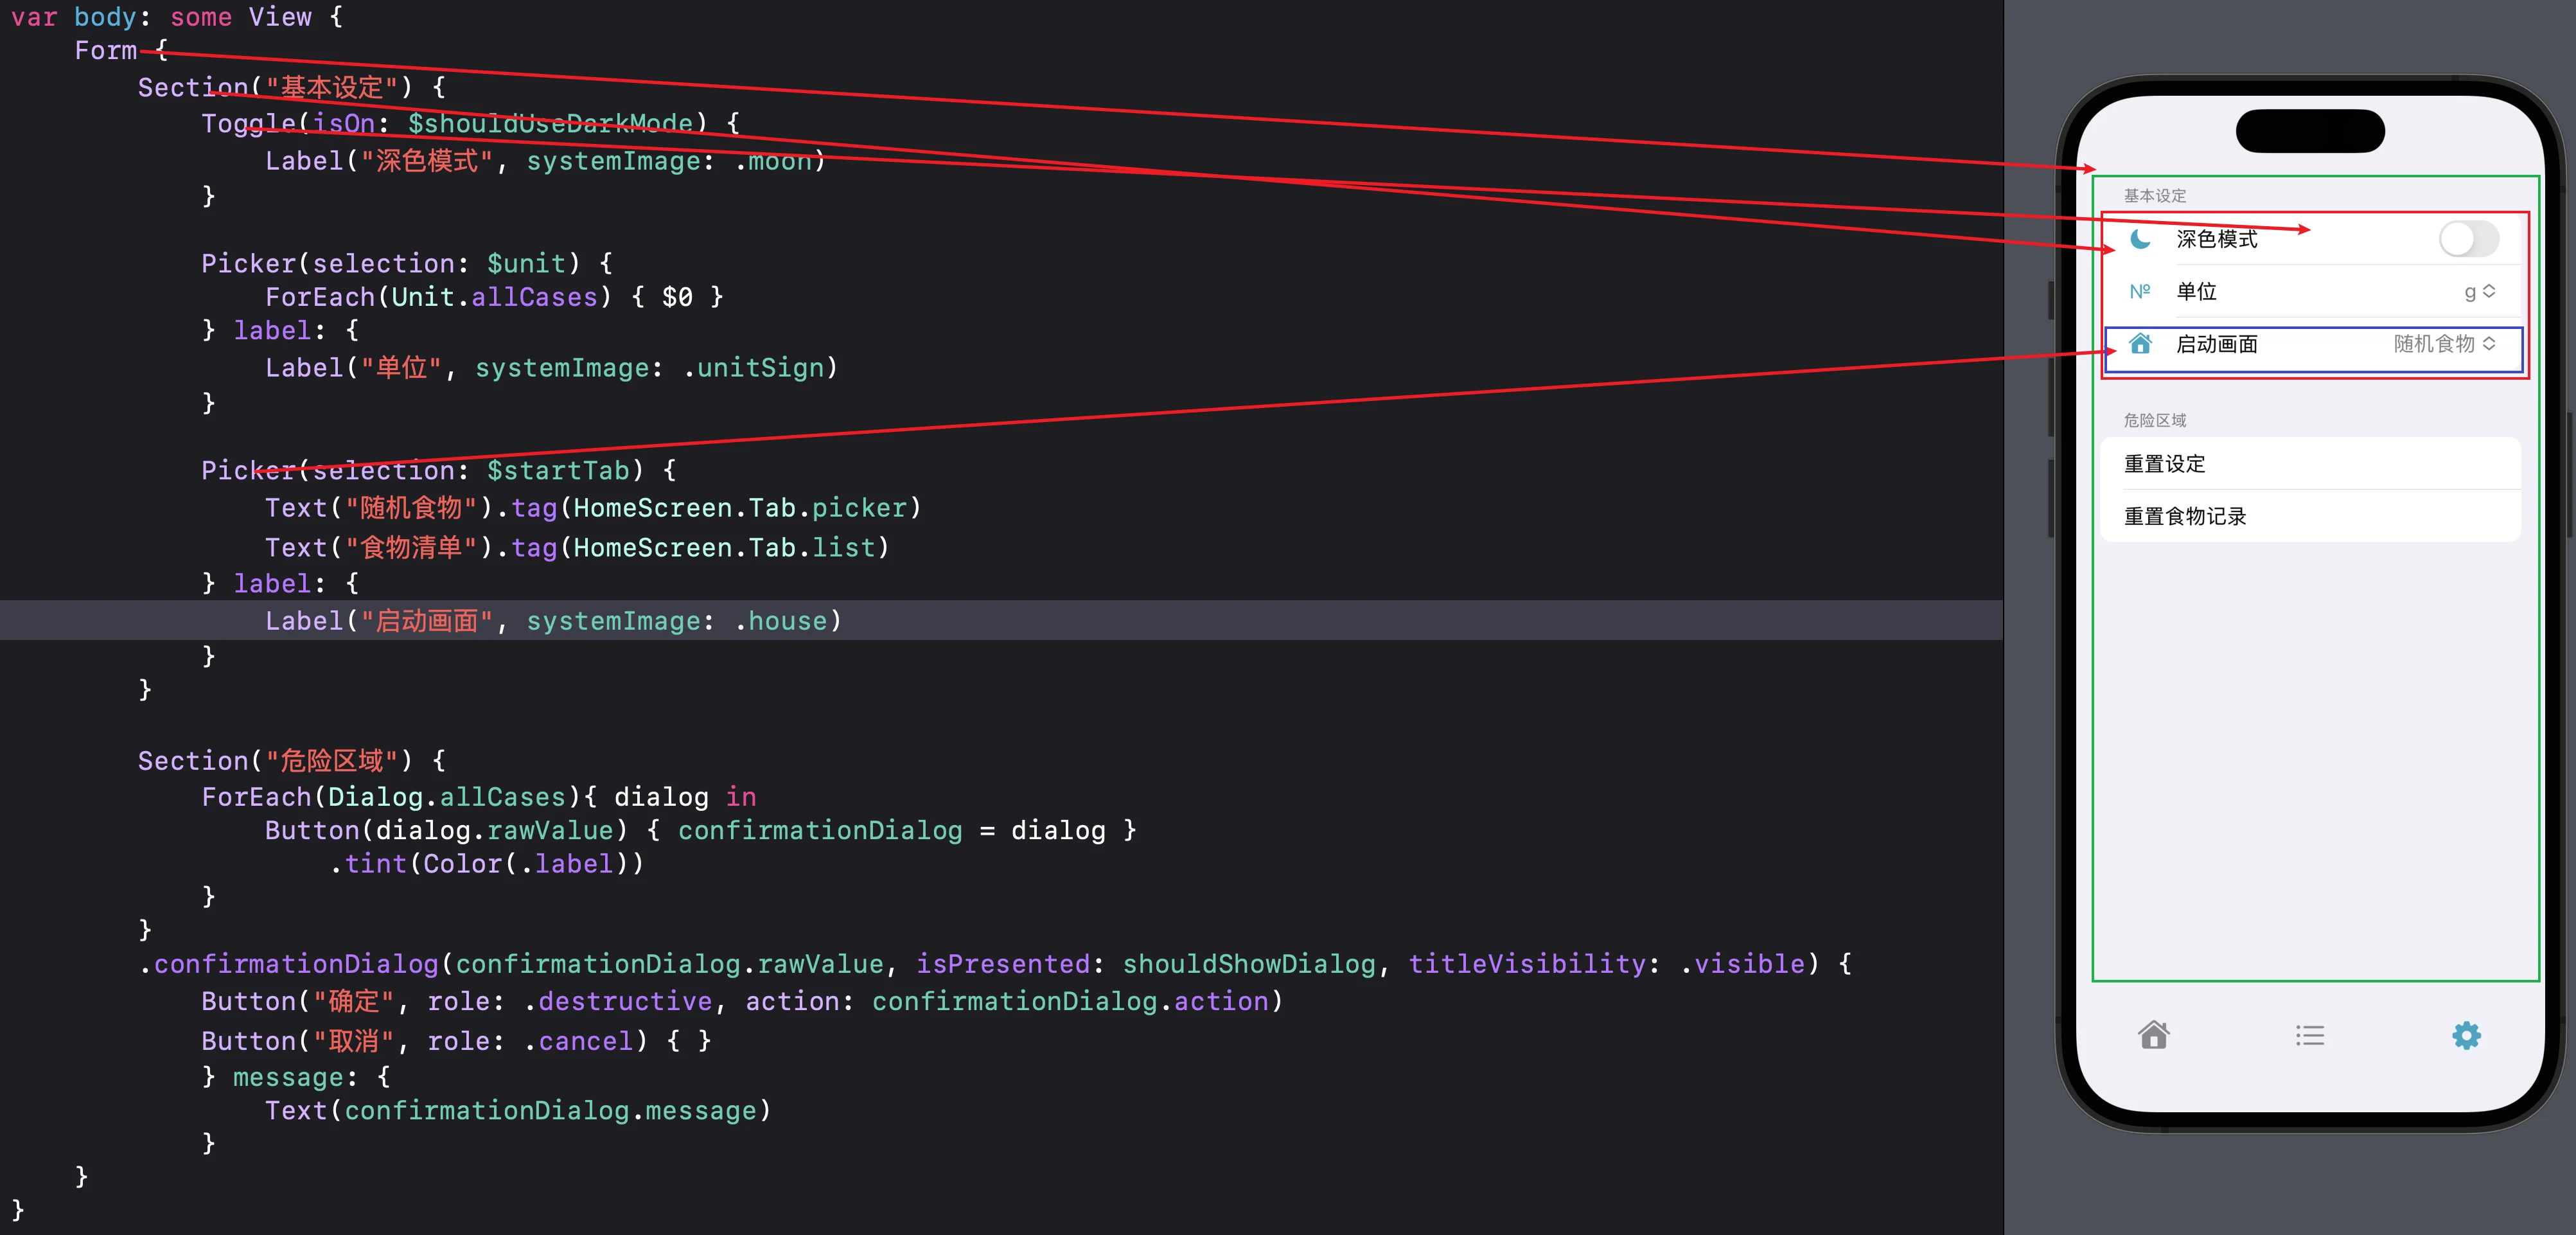
下面是该SwiftUI框架对应的UI示意图
1
2
3
4
5
6
7
8
9
10
11
12
13
14
15
16
17
18
19
20
21
22
23
24
25
26
27
28
29
30
31
32
33
34
35
var body: some View {
        Form {
            Section("基本设定") {
                Toggle(isOn: $shouldUseDarkMode) {
                    Label("深色模式", systemImage: .moon)
                }

                Picker(selection: $unit) {
                    ForEach(Unit.allCases) { $0 }
                } label: {
                    Label("单位", systemImage: .unitSign)
                }

                Picker(selection: $startTab) {
                    Text("随机食物").tag(HomeScreen.Tab.picker)
                    Text("食物清单").tag(HomeScreen.Tab.list)
                } label: {
                    Label("启动画面", systemImage: .house)
                }
            }

            Section("危险区域") {
                ForEach(Dialog.allCases){ dialog in
                    Button(dialog.rawValue) { confirmationDialog = dialog }
                        .tint(Color(.label))
                }
            }
            .confirmationDialog(confirmationDialog.rawValue, isPresented: shouldShowDialog, titleVisibility: .visible) {
                Button("确定", role: .destructive, action: confirmationDialog.action)
                Button("取消", role: .cancel) { }
                } message: {
                    Text(confirmationDialog.message)
                }
        }
    }
- Form –> 有点类似UIKit中的UITableView
- Section –> 有点类似UIKit中的UITableView中的Section 在swiftUI中被独立成一种容器
- Toggle/Picker/Button –> 有点类似UIKit中的UITableViewCell并且里面已经布局好了Switch和其他选择器、按钮等
@AppStorage UserDefault的属性封装器
这个@AppStorage 是SwiftUI中的UserDefault的封装形式,用于本地存储类似NSUserDefault的方式存储key和value或者object,最终归档到plist文件中.
举个例子
1
@AppStorage("shouldUseDarkMode") private var shouldUseDarkMode: Bool = false
当在swiftUI中声明一个变量叫做shouldUseDarkMode 它的默认值是false,当UserDefault中取值取到的时候,这个shouldUseDarkMode成员变量就是取到的真实值,如果没取到 false作为没取到的备选默认值.
@AppStorage(“shouldUseDarkMode”) 这里的字符串就是UserDefault要取值时候的key.
.environment 环境变量
1
2
3
4
@AppStorage(.shouldUseDarkMode) private var shouldUseDarkMode: Bool = false //深色模式
@AppStorage(.unit) private var unit: Unit = .gram
@AppStorage(.startTab) private var startTab: HomeScreen.Tab = .picker
@State private var confirmationDialog: Dialog = .inactive
这里的Toggle也就是我们之前在UIKit中学习的switch开关触发的值直接关联到@AppStorage("shouldUseDarkMode")中,并且也会更新成员变量,这些操作都是SwiftUI帮我们做的.
当做完这个操作后要马上生效
这个时候我们要改动类似工程中的如下代码:
1
2
3
4
5
6
7
8

var body: some View {
    TabView(selection: $tab) {
        ForEach(Tab.allCases, id: \.self) { $0 }
    }
    .environment(\.colorScheme, shouldUseDarkMode ? .dark : .light)
}
这样改动虽然马上生效但是并不会作用于全局的ViewController之类的视图上,这个改动只会改动从响应者链条中最顶层的VC,假设有个某某DetailVC present出来 它将不受此环境控制
为了解决这个问题需要在顶层使用如下代码包裹起来,并使用preferredColorScheme()函数更改才会全局生效
1
2
3
4
5
6
NavigationStack {
    TabView(selection: $tab) {
        ForEach(Tab.allCases, id: \.self) { $0 }
    }
    .preferredColorScheme(shouldUseDarkMode ? .dark : .light)
}

如上就是这一部分学习到的技巧
完成代码如下 :
1
2
3
4
5
6
7
8
9
10
11
12
13
struct HomeScreen: View {
    @AppStorage("shouldUseDarkMode") var shouldUseDarkMode = false
    @State var tab: Tab = .settings
    var body: some View {
        NavigationStack {
            TabView(selection: $tab) {
                ForEach(Tab.allCases, id: \.self) { $0 }
            }
//            .environment(\.colorScheme, shouldUseDarkMode ? .dark : .light)
            .preferredColorScheme(shouldUseDarkMode ? .dark : .light)
        }
    }
}
编码和解码(序列化类型Json)
上述代码都是简单的用@AppStorage 存储普通数据类型,但是 如果它是一个Person对象的话该如何存储呢?
如果想被@AppStorage使用,也就是UserDefault使用则必须要实现编码和解码,有点类似NSObject要是Copy协议一样类似的操作,在swift里面是一个合成协议叫Codable,这个Codable中包含Decodable & Encodable
如下代码:
1
2
3
4
5
6
7
8
9
10
11
12
13
14
15
16
17
18
19
struct Person : Codable {
    var name: String
    var age: Int
}

//编码 调用时
let person = Person(name: "sunyazhou.com", age: 33)
let data: Data = try! JSONEncoder().encode(person)
let string: String = try! String(data: data, encoding: .utf8) ?? ""
print(string)  //输出; {"name":"sunyazhou.com","age":33}

//解码调用时
let string = """
{"name":"sunyazhou.com","age":33}
"""
let data: Data = string.data(using: .utf8)!
let person: Person = try! JSONDecoder().decode(Person.self, from: data)
print(person)  //输出:Person(name: "sunyazhou.com", age: 33)
实现Codable协议自动生成Decoder和Encoder
Xcode14以后会自动帮我们生成一个struct的编码和解码方式
当我们 按住command+左键点击Pseron的结构体的时候会出现一个列表
如下图:

点击AddExplicitCodableImplementation选项会自动帮我们为Person生成如下.
1
2
3
4
5
6
7
8
9
10
11
12
13
14
15
16
17
18
19
20
21
22
23
24
25
26
27
28
29
30
31
32
33
34
35
36
37
38
39
40
41
42
43
44
45
struct Food: Equatable, Identifiable, Codable {
    var id = UUID()
    var name: String
    var image: String

    @Suffix("大卡") var calorie : Double = .zero
    @Suffix("g") var carb      : Double = .zero
    @Suffix("g") var fat       : Double = .zero
    @Suffix("g") var protein   : Double = .zero

    enum CodingKeys: CodingKey {
        case id
        case name
        case image
        case calorie
        case carb
        case fat
        case protein
    }

    init(from decoder: Decoder) throws {
        let container: KeyedDecodingContainer<Food.CodingKeys> = try decoder.container(keyedBy: Food.CodingKeys.self)

        self.id = try container.decode(UUID.self, forKey: Food.CodingKeys.id)
        self.name = try container.decode(String.self, forKey: Food.CodingKeys.name)
        self.image = try container.decode(String.self, forKey: Food.CodingKeys.image)
        self._calorie = try container.decode(Suffix.self, forKey: Food.CodingKeys.calorie)
        self._carb = try container.decode(Suffix.self, forKey: Food.CodingKeys.carb)
        self._fat = try container.decode(Suffix.self, forKey: Food.CodingKeys.fat)
        self._protein = try container.decode(Suffix.self, forKey: Food.CodingKeys.protein)

    }

    func encode(to encoder: Encoder) throws {
        var container: KeyedEncodingContainer<Food.CodingKeys> = encoder.container(keyedBy: Food.CodingKeys.self)

        try container.encode(self.id, forKey: Food.CodingKeys.id)
        try container.encode(self.name, forKey: Food.CodingKeys.name)
        try container.encode(self.image, forKey: Food.CodingKeys.image)
        try container.encode(self._calorie, forKey: Food.CodingKeys.calorie)
        try container.encode(self._carb, forKey: Food.CodingKeys.carb)
        try container.encode(self._fat, forKey: Food.CodingKeys.fat)
        try container.encode(self._protein, forKey: Food.CodingKeys.protein)
    }
}
@Suffix()是我自定义的一个属性封装器用于给某个变量字符添加默认的后缀,这里可以不用care它.
这里注意有的xcode不会生成这么全面是因为有很多extension 比如:
1
2
3
extension Food: Codable{

}
这的代码是在扩展里写的不是在Person声明的地方写的Xcode会找不到,最好的方式肯定是写在一起最好.
总结
以上是学习完第四章的内容总结,潦草了些,希望通过记录能让以后使用的时候印象更加深刻也方便分享给其它需要的人.